Practice makes perfect, so you need to allow a little time for learning how to make good recordings. If you are using a recording studio, you will work with a partner, one of you acting as recording engineer whilst the other is the voice talent. If you are recording at home, you will do both jobs yourself.
For 2023-24, students should use the University recording studios: instructions are below.
Microphone technique
Good technique is important for high quality recordings, and always remember that consistency is crucial, so take a few photos of the setup so you can reproduce it in subsequent sessions.

With a headset microphone, it’s important to place it to one side of the mouth to avoid breath noises
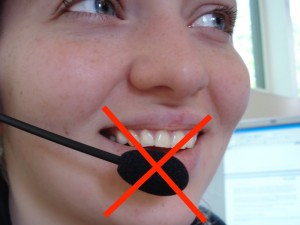
don’t place it below the mouth because you will still get breath noises from the nose
and don’t touch it whilst recording!
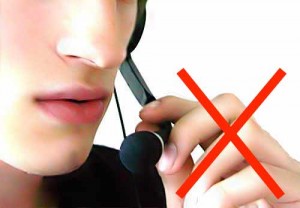
With a stand-mounted microphone, again you need the microphone placed to avoid breath noises from the mouth or nose, and kept at a constant distance (20-30cm). Make several test recordings to find a position that sounds good. During the recording sessions, the engineer should keep an eye on your voice talent: don’t let them move around in the chair.
Getting the recording level correct
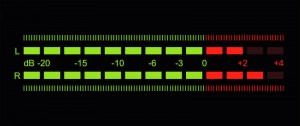
With digital recording, it’s essential that you never ‘hit the red’ when recording because you will get hard clipping and that will sound very bad (as well as potentially interfering with the signal processing we need to do later).
But on the other hand, you do want to record at the highest level possible (what a recording engineer would call ‘hot’) so that you make the most of the available bit depth. Recording at too low a level is equivalent to using fewer bits per sample, and can also make any imperfections in the audio signal chain (such as electrical noise within the microphone amplifier) more obvious.
Recording software
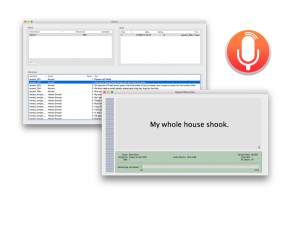
If you’re recording on a Mac, then you can use CSTR’s SpeechRecorder software that presents each prompt to the voice talent, and saves the recordings in individual files. Here’s the manual. To load your own sentences into this tool, they need to be in Festival’s standard ‘utts.data’ format.
If you don’t have a Mac, then try this Python alternative to SpeechRecorder created by previous student Tim Loderhose, and now updated and maintained by Dan Wells.
Making good, consistent recordings
You will find that you can probably record for a maximum of 2 hours at a time, with short breaks every 30 minutes or so. After that your voice will start to become creaky. Stop when this happens: you need your voice to stay consistent (it may also be damaging to your voice to speak for excessively long periods). Some recording tips:
- Switch your phone, and that of anyone else in the studio, off or place it in ‘airplane’ mode (not just silent mode) to avoid interference.
- Take a bottle of water with you and take frequent sips during recording.
- Write down (or take a photos of) the recording levels you are using and set the same levels in every session.
- Ensure chair, microphone, etc. are positioned the same way in every session (again, photos are helpful here).
- Make sure any ventilation fans are switched off during recording.
- When you are speaking, ensure that you are not fidgeting, playing with any of the cables, your hair, etc…
Of course, you should make plenty of test recordings at the outset, and listen back to them carefully over headphones to spot any problems. Once you have perfected your technique, go ahead and record the ARCTIC ‘A’ set. You should build a voice from this, to confirm that you have made sufficiently-good quality recordings, before returning to the studio to record your own material.
During the actual recording, try to get each sentence correct in a single attempt. Don’t waste time on multiple takes, except in those few cases where you made a major error. The engineer should keep notes about any sentences that need checking after the recording session.
At the end of each session, make back up a copy of your recordings on a memory stick (if using a recording studio), and/or back them up somewhere secure.
Log in- Using the University recording studiosThe University has two recording studios available for you to use.
Step 1: read this
Studios
You will be allocated to one of the two available studios and should use the same studio to make all your recordings. The microphone and other equipment may differ between them, which will make the recordings sound different. You do not want to build a unit selection voice from data with varying recording conditions.
Training is provided for groups of up to 3 students
You need to attend a training session with the studio technician or a tutor, for the studio you have been allocated to. You must complete this training before making your recordings.
Form a group of 3 students who will attend one training session together. Appoint one student to be the leader. The leader should check the availability of everyone in the group, then check the available training sessions for the appropriate studio, then book a training session.
Recording is done by pairs of students
For recording, you just need to form pairs. One of you will be the Voice Talent, and the other will be the Engineer. Then you’ll swap places. If you really want to stay in your group of 3 from training, you can do that, but it’s more efficient for form pairs.
Do you have a DICE account?
To view the booking system for the Informatics Forum studio, you (or your recording partner) needs a DICE (Informatics computing system) account. If neither of you has one, please switch over to the Appleton Tower studio.
Step 2: book a training session
Appleton Tower
- Check the available training sessions here (make sure to look at the “Appleton Tower” tab of this workbook)
- Send an email to the PPLS Studio Technician ppls.studio@ed.ac.uk with subject “Speech Synthesis training session booking request (Appleton Tower)”. List all the sessions that your group is available for. The Studio Technician will enter your group into the sheet above, and confirm by email.
- Your studio is located in the basement of Appleton Tower.
Informatics Forum
- Check the available training sessions here (make sure to look at the “Informatics Forum” tab of this workbook)
- Send an email to the Tutor Atli Sigurgeirsson <A.T.Sigurgeirsson@sms.ed.ac.uk> with subject “Speech Synthesis training session booking request (Informatics Forum)”. Specify all the sessions that your group is available for. The Tutor will enter your group into the sheet above, and confirm by email.
- Your studio is located in the basement of the Informatics Forum. You will need to sign in at reception in order to enter this building. Then proceed down the stairs which are in the middle of the atrium.
Step 3: book recording sessions
Do not book any recording sessions until you have completed the training session!
Once you are trained, you may book a recording session in your studio. In order to maximise availability of the studios for everyone, each booked session should be a maximum of 2 hours in duration. Quickly cancel any booking that you no longer require.
Appleton Tower
- Check availability and make a booking yourself on the PPLS Appleton Tower booking system – this requires EASE authentication
- For Project title, write “Speech Synthesis recording”
- For Full description, list the people who will take part in the session
- Type: internal
- For Email Address, write the email address of the person making the booking, in s1234567@ed.ac.uk format
- Consent has been obtained: tick
- For Full Name, write the name of the person making the booking
- Booking is for Internal PPLS use of the studio: tick
- Each recording pair may hold a maximum of two hours (i.e., 1 x 2-hour, or 2 x 1-hour) of future bookings at any time.
Informatics Forum
- Check availability on the Informatics Studio booking system (Areas > Sound Studios > Hemi-Anechoic Chamber) – this is only accessible from within the University network (including via the VPN) and requires a DICE account. Available slots are marked with “Available to book for Speech Synthesis” or are empty. You may only use this studio between 09:00 and 17:00 on weekdays.
- Email a booking request from your University email account to Simon.King@ed.ac.uk with subject “Speech Synthesis recording session booking request (Informatics Forum)” in which you
- list all the people who will take part in the session (student number + full name)
- list possible dates/times/durations of the slot(s) you want, in order of preference
- Simon will book the first available slot(s) from your list, and confirm by email
- Each recording pair may hold a maximum of two hours (i.e., 1 x 2-hour, or 2 x 1-hour) of future bookings at any time.
- Create a studio at homeIf you don't have access to a recording studio, it's perfectly possible to make good quality recordings at home.
Environment
It’s obvious that you’ll need somewhere quiet, but it’s equally important to reduce reverberation (reflection of sound from surrounding surfaces).
Bad:
- Hard floors such as wood or tiles
- Bare walls
- A desk or table with a large horizontal surface
Good:
- Carpet or rugs
- Soft furnishings such as a bed, sofa, heavy curtains
Best:
- Create a mini-studio by arranging sound-absorbing objects behind and around the microphone.
- A simple option is to open your wardrobe doors. Place the microphone inside the wardrobe (not touching any clothes) and record facing into it.
- Another option is to arrange cushions in a box shape and place the microphone inside.
- You are trying to make something that works like this or this without spending any money.
Microphone
You generally don’t want to use the microphone built in to your laptop. The laptop is a source of noise, and you’ll also find it hard to get it into a convenient close-talking position.
A surprisingly good option is the microphone built in to wired Apple iPhone earbuds (the type with a 3.5mm 4-ring jack connector), which will plug in to a Mac’s headphone socket. You’ll need a way of mounting it in a suitable position (do not hold it in your hand, or use it hanging from your ear – it will move about). You could use an elastic band to attach it to a suitable object such as a tall bottle. Other brands of similar microphone might also be good, although we haven’t tested any.
If you don’t have one of those Apple microphones, you need some other external microphone. Unless you really know what you are doing (in which case you probably don’t need this guide), this will be a microphone that connects directly to a USB port.
If you’re in the market for a new microphone for podcasting or videoconferencing, then the Blue Snowball iCE is excellent at that price point. Amazon’s Basics Desktop Mini Condenser Microphone is also very good value.
Be aware that some USB headsets produced specifically for video conferencing have a rather narrow bandwidth – make a test recording and inspect the spectrogram to find out.
Pop shield
Unless you have really excellent microphone technique, you are likely to get “popping” with plosive sounds, as a puff of air hits the microphone. The solution to this is a pop shield (also called a pop filter) but you can make your own then set it up like this.
If you don’t want to use a pop shield, then good microphone placement and voice talent technique is essential. One option is to suspend the microphone from above at eye level and speak so that your breath passes below it, but this will get in the way of reading a script. Another option is at or just below mouth level and slightly to one side. Experiment and make test recordings.
Laptop
You will probably be recording on to your laptop from an external microphone, and you’ll also be reading the prompts from the laptop screen. Try to place the laptop in a way that minimises noise picked up by the microphone. Use something sound absorbent to block the noise if necessary. As always, making test recordings with a variety of setups will help you decide what’s best.
Automatic Gain Control (AGC)
Some operating systems and/or audio hardware may have a feature which aims to continuously adjust recording volume levels automatically in response to how loud the sound reaching the microphone is. This is called Automatic Gain Control, and it may be switched on by default on your machine. This can work well for things like Zoom calls (though it can also cause problems when it doesn’t work properly!), but for recording speech data to build a speech synthesis voice it is bad for two reasons:
- continuously changing the recording gain could potentially introduce inconsistency into the recordings – for example, a short sequence of naturally loud phones may cause the following phones to be recorded quieter than they should be
- recording noise can be made louder at quiet points (the noise floor can be raised)
Therefore, it is important to make sure you don’t have AGC active when recording your own speech data. It does not seem this is a problem on Macs, but you’ll find online instructions for how to disable this on Windows and Linux (e.g. pulseaudio), for example: